|
|
||||||
|
|
|
|
Download | |||
Diamond Version 5 User Manual: Display of structure pictureDesigning atoms
Previous article: Other effects
Diamond associates designs, radii, and other properties to each atom type. When atoms are created, each new atom will get the properties of the corresponding atom type.
To get more information about terms like created atoms, atom types, and atom groups,
see the article "About toms, Atom Groups, Bonds, and Bond Groups".
The properties of every single created atom can be changed afterwards independent from its associated atom type. This article describes:
· How to edit design, radii, and other properties for the atom groups and sitesmanual_display_atomdesign_atomtypes>manual of the current structure.
· How to edit design, radii, and other properties for individual atoms ("created atoms").
· How to design colors and styles (interior, edge, pattern) of an atom group or site design or an individual atom's design.
· How to edit the radii of the atom groups or created atoms.
· How to change atom radii using the mouse wheel.
· How to define material properties for rendered representation.
· How to assign selected properties to multiple or all atom groups or sites of the current structure. • How to copy the style of an atom and paste it to selected atoms.
Designing Atom Groups and Sites
The design, radii, and other properties of each atom type serves as basis for all created atoms associated with that atom type. When you alter the properties of one or more atom types, these changes may overwrite the properties of all created atoms associated with those atom types.
To open the Atom Group and Sites Designs dialog, choose the Atom Designs command from the Display menu. If no atom is selected in the structure picture, the dialog immediately opens. If at least one atom is selected, you have the choice between the Atom Group and Site Designs and the Atom Design dialog, where the properties of the selected atoms can be set.
Here we focus on the Atom Group and Sites Designs dialog.
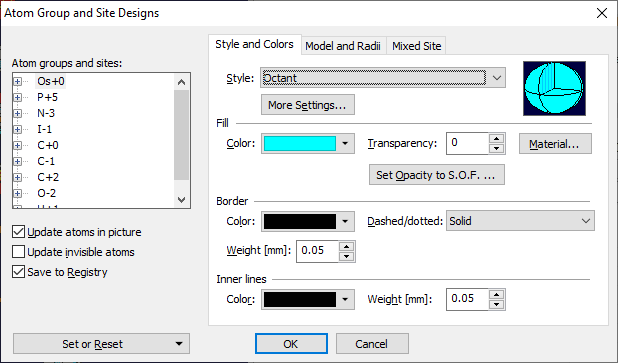
The dialog offers three pages:
· Style and Colors: Defines style, interior, edge, and pattern properties.
· Model and Radii: Defines several radii used for drawing or for calculating bonding spheres. · Mixed Site: Defines different colors for each element ("component") contributing to mixed site atom groups.
The screenshot shows the Atom Group and Site Designs dialog for the sample bis(triphenylphosphineiminium) 15-carbonylpentaosmium carbide iodide from ICSD Collection Code 23119, with the Style and Colors page in the front and the first atom group "Os+0" selected. Select the atom group whose atom design you want to edit from the list at the upper left of the dialog window, and make the changes on the several pages of the dialog as far as needed. You can also change the atom design on atom site level. Therefore click on the plus symbol in the tree and choose the atom site of interest.
You will find details about colors, styles, radii, etc. in the following sections of this article: - Radii,
Updating existing atoms
By default, Diamond updates all created atoms when you close the Atom Group and Site Designs dialog with OK.
That means each created atom gets the design of its associated atom type. If you define red oxygen and black carbon atom types, for example, all oxygen and carbon atoms in the structure picture become red and black, rsp. Individual settings will be overwritten. To disable this automatic update mechanism, switch off the Update atoms in picture checkbox.
The disabled update mechanism may be useful for the following situation:
You have filled the contents of the unit cell, with e.g. all oxygen atoms red. Now you want to display further coordination spheres with oxygen atom yellow. Then you do the following steps:
1. Define the color red for the atom type O.
2. Fill the contents of the unit cell.
3. Define the color yellow for the atom type O. Assure that the Update atoms checkbox is not checked.
4. Continue building up the structure, for example fill the coordination spheres.
Updating resources
The Diamond section of the Windows registry contains design informations for some hundreds of atom types. If the checkbox Save to Registry is checked, these informations will be updated whenever you confirm the Atom Group and Site Designs dialog with OK.
Resetting all atom group and site designs If you want to reset all colors, styles, radii, etc. for all atom groups and sites of the current structure picture, push the Set or Reset button and choose the Reset Atom Group and Site Designs command from the dropdown menu. This restores the designs of all or selected atom groups and/or sites of the current compound. There are several options what and how to reset in the Reset Atom Group or Sites Designs dialog.
Designing Selected Atoms
This part of the article describes how to edit the colors, styles, radii, and material properties of a single atom or of multiple selected atoms.
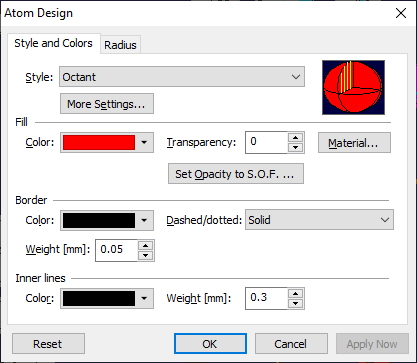
These settings are defined in the Atom Design dialog, which uses two pages:
- Style and colors: Defines the colors and styles of the atom(s).
- Radius: Defines the drawing radii of the atom(s).
Editing a single atom's properties
The easiest way to design a single atom is to double-click on the atom.
Alternatively, you can click with the right mouse button on the atom, and then choose the Edit -> Atom Design command from the context menu.
Editing properties for multiple atoms
Select the atoms you want to edit. There are several ways to select atoms; see the article "Selecting objects".
Then click with the right mouse button into one of the selected atoms, and choose the Edit -> Atom Design command from the context menu.
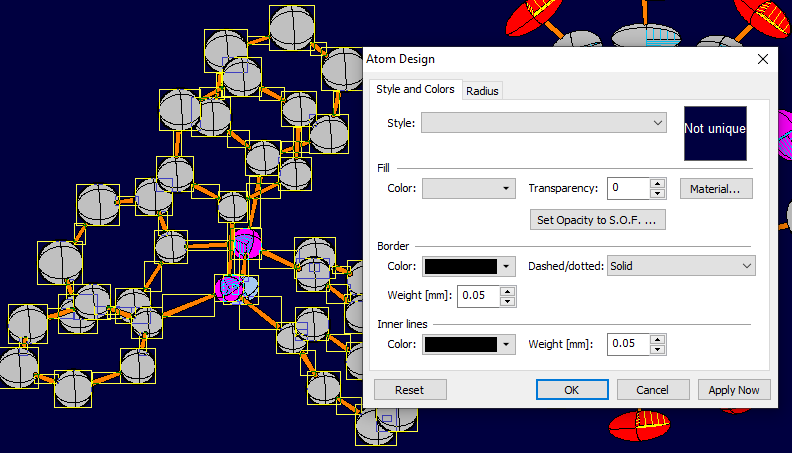
Properties which are not unique for all selected atoms, keep blank in the corresponding control in the dialog window. For example, if you have selected nine atoms with the interior color red and one with yellow, the color selection field for the interior color will be empty. If you leave this field empty, the interior colors of the selected objects will be untouched. If you select a color, all selected atoms will get that new interior color.
In this screenshot a complete molecule has been selected. Since the selected atoms use different styles and interior colors, the fields Style and Interior color are blank, whereas the other settings are unique.
Colors and Styles
The design of an atom (or atom group or site) is made up of the following settings:
Since rendered representation uses neither edges nor patterns or hatching, some of the above settings will be used only in flat representation.
You will find all these settings on the Style and Colors page of the Atom Design dialog or Atom Group and Site Designs dialog, rsp.
Styles
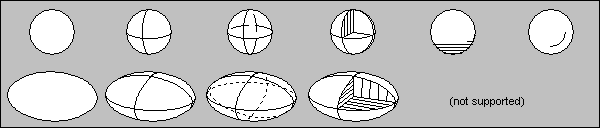
Diamond offers several styles, most of them are ORTEP-like. If simple spheres are used to display atoms (non-ellipsoid representation), Diamond uses pre-defined patterns, which means that the axes and ellipses in the pattern do not represent any directions of thermal vibrations. In ellipsoid representation, the axes and ellipses will of course be calculated correctly. The following illustration lists all available styles in spheroid (upper row) and ellipsoid representation, rsp.
From the left to the right: Solid/Empty, Cross 1, Cross 2, Octand, Shadow, Crescent
The last "style" in the style list is "invisible". This style can be used to display broken-off bonds.
Interior color and brush
Defines if and how the atom is filled and which color is used, as far as necessary. The color is defined in a color select box.
Several brushes are available to fill the interior:
The six hatching types used by Diamond.
Edge color, pen, and thickness
Defines if and how an edge is drawn around an atom and which color is used, as far as necessary. Several pens are available for the edge:
Pattern color and thickness
Defines the color and the line thickness in millimeters for a pattern if the atom style uses a pattern. The color is also used for a hatching brush (see Interior settings).
Invisible edges and/or interior
If you assign the style "invisible" to an atom, this will not be drawn, and all bonds to that atom will be shortened ("broken-off" bonds). If you want to avoid the broken-off effect, you should use the style "Solid/Empty" instead, together with a transparent brush and "No edge".
Rendered representation When using rendered representation, atoms use the interior color only. No edge and no pattern or hatching is used.
Radii
For every atom (or atom group or site), two different drawing radii can be defined, the radius for ball-and-stick and the radius for space-filling model. Note: For atom groups (but not for single atoms), you can also define the effective radius, which is used to calculate bonding spheres. This effective radius is defined in the Atom Groups dialog, called from the Build (not Display) main menu.
You can edit the radii on the Radius page of the Atom Design dialog or on the Model and Radii page of the Atom Group and Site Designs dialog, rsp.
Drawing radius for ball-and-stick model
Defines the radius in Angstroems which is used to display the atom (or an atom basing upon this atom group or site) in the ball-and-stick model.
This radius may be multiplied with the "ligand atoms reducing factor",
which is used to decrease the size of atoms on corners of coordination polyhedra. Note: The "overall radius factor", which was used to enlarge or decrease all atoms in the same way, and which was usually 1.0, is not more in use since Diamond version 4.
Drawing radius for space-filling model
Defines the radius in Angstroems which is used to display the atom (or an atom basing upon this atom group or site) in the space-filling model.
Effective radius (for bonding spheres) The effective radius is used only by atom groups and is defined in Angstroems like the drawing radii. This radius is used to calculate bonding spheres. For more information, how bonding spheres are calculated, read the article "Connectivity, part 1: Bonding spheres".
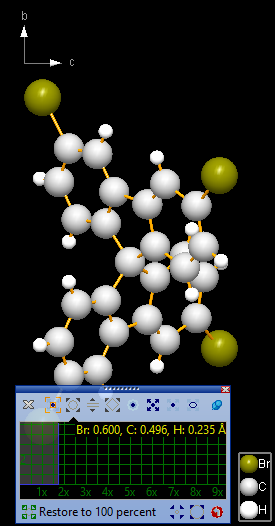
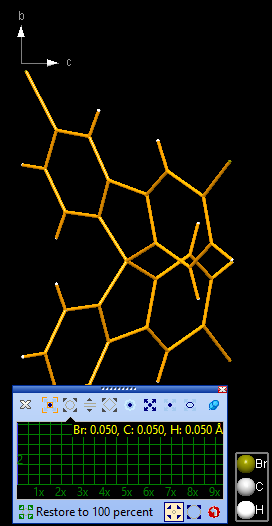
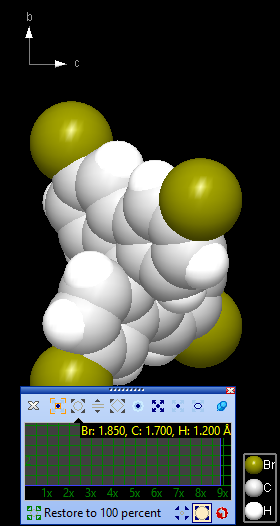
Using the mouse wheel to change atom radiiDiamond offers several so-called "mouse wheel modes". These modes have in common that a tick of the mouse wheel changes a property each. (To get more informations about the several mouse wheel modes, read the article "Using the Mouse Wheel".) Here we show the wheel mode to scale atom radii. It either applies Every tick of the mouse wheel increases the radius of the (selected) atoms by some percent. The starting point is 100 percent (or "1x"). To enlarge the atom radius/radii, move the mouse wheel forward. To reduce the radius/radii, move the mouse wheel backward. The maximum value is reached, when the radius corresponds with the space-filling radius of the atom, whereas the minimum value corresponds with the associated bonds' radii.
To start the wheel mode "atom radii" either: Alternatively, you can do a long click with the mouse wheel button, which selects the whole molecule. (The blue markers now frame the whole molecule.) The histogram in the control window shows the scaling factor relative to the starting point of the mouse wheel mode ("1x", "2x", etc.).
Since no atom has been selected in our sample structure picture, the "Atom Radii" mouse wheel mode refers to all atoms in the structure picture. When starting the blue ruler is on the "1x" position. The (absolute) radii of the atoms are given in the top right of the histogram, here: Br 0.345 Å, C 0.285 Å, H 0.135 Å. You can scale the atom radii factor relative to the radii when the mouse wheel action has started (100 percent or 1x) by turning the mouse wheel up and down.
The buttons below the histogram (from left to right): The screenshots below show (from left to right):
The pin button at the right end of the upper icon row changes between permanent and temporary display of the control window. To re-display the control window after it has disappeared after a short while, press the F7 key. The small red/white 'x' in the right end of the title bar of the control window hides the window. To terminate the atom radii mouse wheel mode, either simply press the Escape key, or click on the closing button of the mouse wheel control window (the left-most in the upper icon row: the 'x' symbol.
Material PropertiesFor every atom group (type), atom site, or atom, individual material properties (surface properties) can be defined. These properties define the shape (shining or matt) of the atom in rendered representation, whereas they take no effect in flat representation. You can edit the material properties by using the Material... push button on the Style and Colors page of the Atom Design dialog or Atom Group and Site Designs dialog, rsp.
The material properties consist of:
Material properties interact with the components of the light source. If you use for example red specular light (green and blue specular component set to zero), the specular highlight appears red instead of white, if you use specular reflectivity of Red=1, Green=1, and Blue=1. If you use different components for specular reflectivity instead, the color changes due to interaction between light source and what the surface reflects and absorbes.
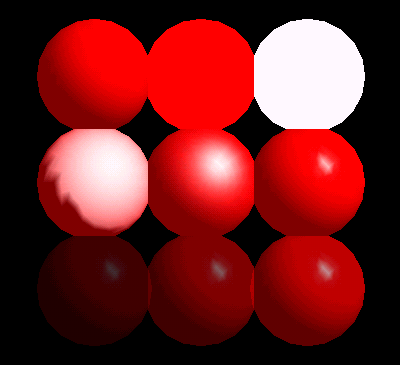
The following illustration compares nine different material settings for an atom with the interior color red, and the following light properties (default settings):
- Specular: Red = Green = Blue = 1
- Diffuse: Red = Green = Blue = 0.8
- Ambient: Red = Green = Blue = 0.3
First row: All atoms with specular reflectivity Red = Green = Blue = 0.
Left: Emissive reflectivity Red = Green = Blue = 0.
Middle: Emissive reflectivity Red = 1, Green = Blue = 0.
Right: Emissive reflectivity Red = Green = Blue = 1.
Second row: Variation of shininess. All atoms with specular reflectivity Red = Green = Blue = 1 and emissive reflectivity Red = Green = Blue = 0.
Left: Shininess = 1
Middle: Shininess = 10
Right: Shininess = 128 (maximum and default value)
Third row: Variation of transparency. All atoms with specular reflectivity Red = Green = Blue = 1 and emissive reflectivity Red = Green = Blue = 0 and shininess of 128.
Left: Transparency = 0.25
Middle: Transparency = 0.5 Right: Transparency = 0.75.
Assigning Selected Properties to Multiple or All Atom Groups or Sites
When you edit the atom groups' (or sites') designs, there is often the need to overwrite several properties of multiple or all atom groups with the same value. For example, if you want to have all atom groups with the same ORTEP-like pattern instead of the default style that uses no pattern, you could - one atom group after the other - select the atom group, change the style, then select the next atom group, change the style, etc. To avoid this, the atom group and site tree list offers multiple selection. So simply select all atom groups and/or sites in the tree list, then set the properties in the Colors and Styles or Model and Radii page. Note: Older versions of Diamond used a Unify Atom Designs dialog to assign selected properties of the currently selected atom group (there was just single selection possible) to all other atom groups. This is not more available.
Copying and Pasting Atom Styles
Diamond offers a poweful and easy to use way to assign a style to one or more selected atoms:
1. With the right mouse button, click on the atom whose style (colors, pattern, edge, radii, material properties) you want to assign to other atoms, and choose the Copy Style command from the context menu.
2. Select the atom or multiple atoms you want to assign that design to. With the right mouse button, click into one of the selected atoms, and choose the Paste Style command from the context menu. Please note that for the Copy Style command more than just one atom can be selected. If these multiple atoms have deviating design properties, e.g. seven grey C atoms and one blue N atom, this property (here: the atom color) will be set to "indeterminate", and the atoms this design will be pasted to will not change this indeterminate property, that means the atom color will remain unchanged.
Previous article: Other effects
References: |
||||||||||||||||||||||||||||||||||||||||||
|
Page last modified October 17, 2024. Copyright © 2024 Crystal Impact GbR. All rights reserved. Contact Webmaster |