|
|
||||||
|
|
|
|
Download | |||
Diamond Version 5 User Manual: Printing, copying, and exporting structure picturesCreating POV-Ray scenesThe POV-Ray assistant helps you to create photo-realistic pictures for this outstanding, free available ray-tracer, with features like textures,
background, ray-tracing, multiple light sources, etc.
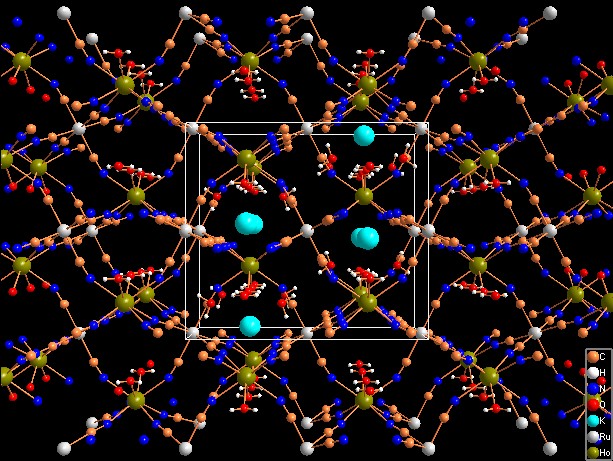
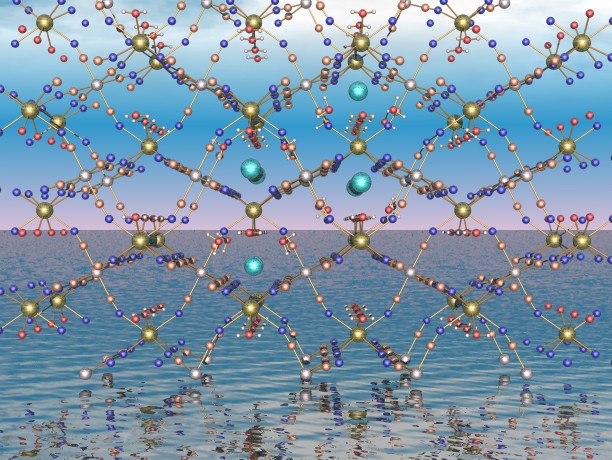
Previous article: Exporting 3D structure picture data OverviewSince version 3, Diamond lets you create POV-Ray scenes. "POV-Ray" stands for "Persistence of Vision Ray Tracer" and is the world's most popular raytracer, a tool for producing high-quality computer graphics. POV-Ray is copyrighted freeware (http://www.povray.org/). The scene is described in a script, the "POV" file, and Diamond gives you a tool to create such POV files from a structure picture, with the help of an assistant that adds background images, textures, pigments, reflections etc. to the scene. The quality of the resulting image will exceed the quality that Diamond offers directly in its rendering mode by far! So as an example, taking this view of "TA1406" (polymeric potassium diaquahexa-μ-cyanoholmium(III)ruthenium(II) dihydrate, by J. A. Kautz, from Acta Cryst. C59 (2003), pp. i89-i91)...
...we create a POV-Ray scene by adding a sky background and an ocean plane. As you see, unlike Diamond, POV-Ray renders shadows and reflections.
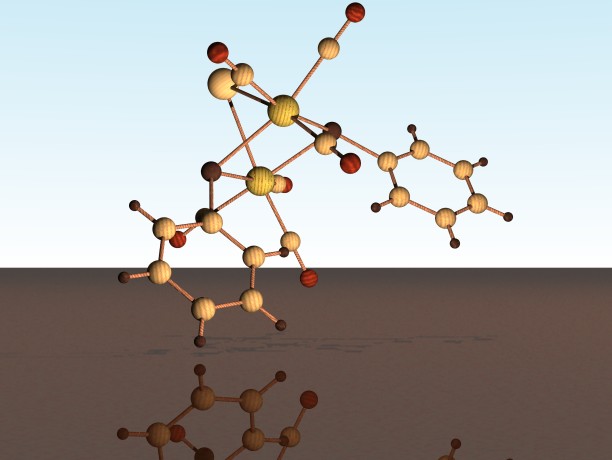
Another POV-Ray image has been created from "TA1215" ("A mixed tribridging dimolybdenum(I) compound: bis(μ-benzenethiolato-S:S)hexacarbonyl-μ-iodo-dimolybdenum(I)(Mo---Mo)", by G. Pan, B. Zhuang, and J. Chen, from Acta Cryst. C55 (1999), pp. 297-298), with "summer sky" background, a reflecting wood floor, and wooden textures for atoms and bonds.
Setup of POV-RayPOV-Ray is not part of the Diamond installation package. If you have not yet installed POV-Ray on your computer for some other purpose than Diamond, you have to install it before you use any of the Diamond POV-Ray rendering functions. If you received Diamond on an installation DVD, you will find the POV-Ray installer on this DVD. If you downloaded the Diamond installation package, you will find the installer for POV-Ray in the Diamond Download Area: https://www.crystalimpact.de/diamond/download.htm. Start the POV-Ray installation program by running the file povwin-3.7-agpl3-setup.exe and follow the instructions on the screen. If POV-Ray is already installed on your PC, it might be necessary to inform Diamond about the directory in which it is present. Diamond will ask for it if necessary. Troubleshooting for POV-Ray rendering engine Although Diamond tries to locate the POV-Ray main executable on your computer, this may fail. If you encounter a "POV-Ray Check Failure" message window with "Unable to locate the POV-Ray engine", you should follow the information in the message window and/or read this information: "Running POV-Ray". Troubleshooting for POV-Ray editor When using POV-Ray for Windows version 3.7 probably a message box will appear whenever you launch POV-Ray to render bitmaps. This displays a message titled with "Could not load internal editor - download it?" You should press the 'N' key ('No') to avoid being forwarded to POV-Ray's download site at this moment, since you really don't need the editor at least at this moment. To avoid being prompted again and again whenever Diamond runs POV-Ray to render bitmaps, you should either install the editor DLL later or disable the "Use editor" setting in POV-Ray later. For more information see: "Disabling the POV-Ray editor". Running a POV-Ray previewYou can run a preview of a POV-Ray picture or scene to get a first quick impression of the picture that will result from the final POV-Ray calculation (which is executed using the Render into Bitmap... command. The command to run the preview as well as the other POV-Ray commands are available from the Tools -> POV-Ray sub-menu. The Preview command opens the POV-Ray Scene Preview dialog, where you can define the size of the preview bitmap as well as some quality settings. (Lower quality results in faster rendering, which may be sufficient as first quick preview.) Use the F1 help key in the dialog to get detailed informations about the quality settings etc. Please note: The preview is also available from the main toolbar:
Where to find POV-Ray settingsThe Tools -> POV-Ray -> Global Settings command opens the Global POV-Ray Settings dialog, where you can define: Use the F1 help key to get detailed informations about the settings on the page of the dialog that is currently open. Defining the apperance of the objects in the POV-Ray scene On the Objects page of the Global POV-Ray Settings dialog, you can define the default material properties (like "glass" or "metal") for objects of any kind (atoms, bonds, polyhedron faces etc.) in the POV-Ray scene. Besides these global object settings, you can also define material properties for individual objects (e.g. atoms or atom groups) by pressing the "Material..." button in the corresponding "Design" dialogs. This will open the Material Settings dialog on which you should display the "POV-Ray" page for this purpose. These individual settings override the material selection in the Global POV-Ray settings dialog. Defining a background Defining a floor Defining light sources Note: Generally, the central projection is recommended for the creation of POV-Ray pictures. If you use parallel projection instead, a tiny little part of the background will only be visible in parallel projection and the floor may also be different from what is displayed in the preview or finally rendered image! Exporting a POV-Ray pictureThe Diamond structure picture can be directly rendered into a raster bitmap file. Besides this, the 3D objects of a structure picture can be exported into a POV-Ray scene file, and optionally opened (e.g. for further editing) in the POV-Ray environment. Creating a POV-Ray scene file By executing the Tools -> POV-Ray -> Create Scene File command you can save a so-called "POV-Ray scene file" (*.pov), using the current structure picture and POV-Ray settings (global as well as individual). This scene file can be read by the POV-Ray editor in order to modify the scene according to your requirements directly in the POV-Ray environment. Rendering into a bitmap The Tools -> POV-Ray -> Render Into Bitmap command opens the Render POV-Ray Scene dialog where you can render the current structure picture ("POV-Ray scene") into a bitmap. You have to define the width and height of the bitmap to be created and the file (BMP or PNG format) to which the rendered picture shall be written to. Besides this, the picture quality (anti-aliasing) can be set. To start the rendering, use the Render push button in the dialog. You can watch the progress of the POV-Ray calculation by activating the option Show POV-Ray Render Window while rendering. If you activate the Open graphics file after rendering option, the result of the POV-Ray rendering calculation will be displayed using the application which is currently associated to the file type you selected (e.g. image viewer for bmp files). Note: Before it starts rendering, POV-Ray will first display its so-called "splash screen". Afterwards, the picture will be calculated starting from its top. Launching the POV-Ray environment The Tools -> POV-Ray -> Launch Environment command first creates a scene file for POV-Ray (similar to the Create Scene File command), using the current structure picture and POV-Ray settings. Afterwards, this scene file will be opened in the POV-Ray editor, where you now can work with the scene directly in the POV-Ray environment. Note: When using POV-Ray version 3.7 and you did not install the POV-Ray editor, this command will either fail or show an auxiliary POV-Ray window where you cannot edit the scene.
The reason is that the POV-Ray editor is not included in the installation package that is offered on our Diamond download page (because it does not use the same "AGPL" license)
but must be installed separately. This is usually done on the last page of the POV-Ray installation procedure. POV-Ray tutorialYou find a comprehensive POV-Ray tutorial in part B (Advanced examples) of the Diamond Tutorial handbook (e.g. available through the Help menu): Creating high quality pictures using POV-Ray. This tutorial shows you how to:
Previous article: Exporting 3D structure picture data |
|
Page last modified August 29, 2023. Copyright © 2023 Crystal Impact GbR. All rights reserved. Contact Webmaster |