|
|
||||||
|
|
|
|
Download | |||
Diamond Version 5 User Manual: Printing, copying, and exporting structure picturesPOV-Ray animations and video sequencesThere are several commands in the "Tools/POV-Ray" submenu that deal with animations and image sequences: "Start Recording POV-Ray Sequence" creates a series of POV-Ray scene files, a series of image files, or a video file (or all of them) from the pictures that Diamond has recorded between an initializing "Start Recording POV-Ray Sequence" and a terminating "Stop Sequence" command. "Create Sequence from Pictures" works similar to the above commands but it does not compile from recorded pictures but from the pictures that are marked as selected in the thumbnails overview when you call the command. "Animated POV-Ray Scene" runs POV-Ray to create a series of images or a video from a rotation or shift animation applied to a single structure picture. In the following examples we will use the zircon (ZrSiO4) [1] dataset from the structure type database (cf. Database with inorganic structure types). Previous article: Creating POV-Ray scenes Creating a POV-Ray sequenceIn principle, creating a sequence of POV-Ray images (as video or as a series of image files) works in the same way as the command "Tools/Video Sequence/Start Recorder" that has been being available in Diamond since version 3. The small but decisive difference is that Diamond does not save a temporary bitmap file whenever it refreshes the structure picture window (which are buffered in an image buffer and finally compiled in the "Create Video Sequence" dialog) but saves a temporary POV-Ray scene file describing the current structure picture each. The "POV-Ray Sequence" dialog that comes up when you run the terminating "Tools/POV-Ray/Stop Sequence" command then offers several settings to let POV-Ray render the images and optionally compiles these images to an AVI video file. These settings are the image width and height as well as POV-Ray quality options. Note: Before we let Diamond create dozens of temporary POV-Ray scene files (for later rendering), you should check, if the global POV-Ray settings are OK, especially if there should be a floor at the bottom of the scene or a sky texture in the background etc. (cf. "Tools/POV-Ray/Global Settings...") and check these with a preview of a single picture, cf. "Tools/POV-Ray/Preview...". Our first example is a building sequence. We start with a blank picture and build up coordination spheres around all atome each starting with the Si atom. Before we do this, we must ensure that automatic adjustment is switched off, the enlargement factor is approx. 0.4 to 0.5 cm/A, and central projection is activated. (1) "Build/Destroy/Destroy all" to ensure the picture is blank.
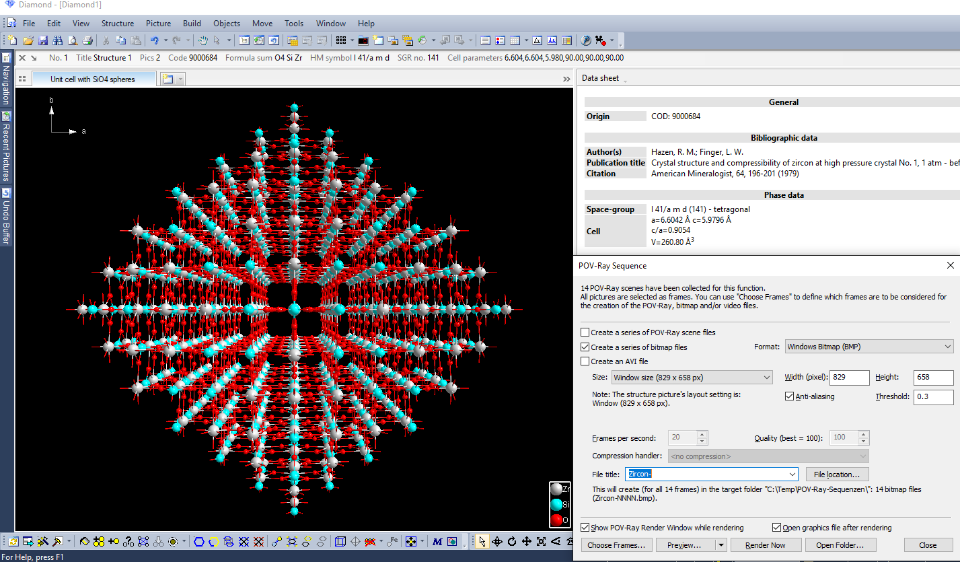
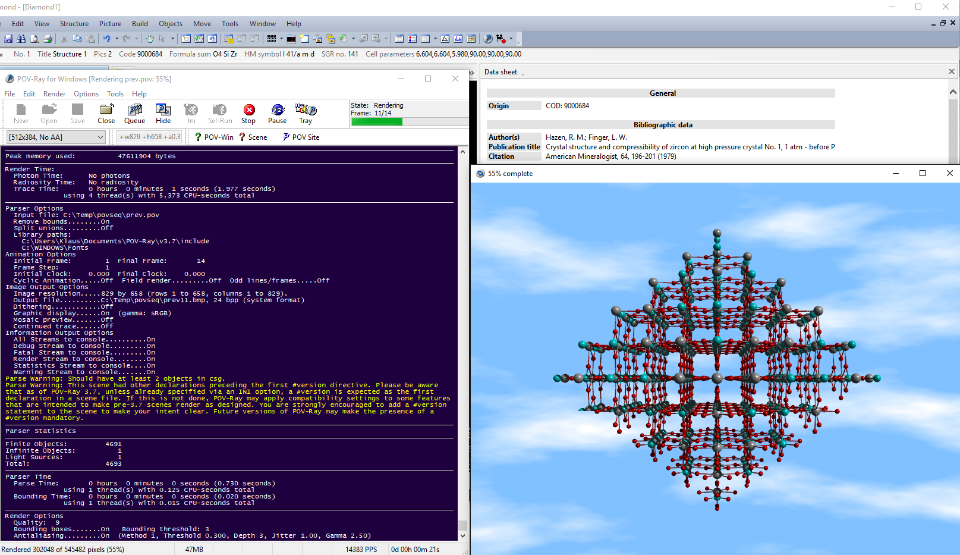
The dialog shows you the number of frames that have been recorded. Like in the Video Sequence dialog, you have the chance to skip unwanted frames from being included in the video or the image series. The Choose Frames command opens the Choose Frames dialog, cf. "Frame selection in video sequence creation". Besides this, there are three checkboxes, where you can decide, if you just want the POV-Ray scene files (Create a series of POV-Ray scene files), a series of image files (BMP, PNG, or JPG) (Create a series of bitmap files), or if you want to create an AVI video file made up of the (selected) frames (Create an AVI file). You can create both image files and a (single) video file or even all kind of files. (But in that case the image format must be BMP. If you want to have a series of PNG or JPG images and a video file, you should first check "Create a series of bitmap files", choose PNG or JPG format, then render with "Render Now", then clear the checkmark and check "Create an AVI file" (which switches the format to BMP) and finally call "Render Now" again, which now renders into (temporary) BMP files and compiles them into an AVI file.) With "Size" you can pre-define the width and height (in pixels) of the images or frames of the video, rsp. These can be individual values as given in the Width and Height input box or be derived from the layout that is defined for the picture (cf. "Picture/Layout..." command) or the current extensions of the Diamond structure picture window. Anti-aliasing should be used (default: on) to get smoother edges. The settings Frames per second and Quality as well as Compression are for the video only. (Cf. the online help for the POV-Ray Sequence dialog (F1 key) to get more infos and notes about these video settings.) File location defines the folder where Render Now will deposit the resulting scene, image, and/or video files, whereas File title is the name (without extension) of the video file and the prefix for the scene and image files. The scene and image files will get a four-digit frame number extension. For instance in the above example (14 frames) you will get 14 image files named Zircon-0001.bmp through Zircon-0014.bmp. Before you go in media res with Render Now and let POV-Ray render a bunch of files, you can make a Preview with reduced image size, no anti-aliasing and reduced quality. The "Preview settings" are available through a dropdown menu that opens when you click on the down arrow at the right side of the "Preview" button. (Note: Independent from the checkboxes, the Preview creates and shows a (temporary) AVI video but does not deposit any files into the target folder.) When running Render Now (or Preview with maximum quality and anti-aliasing on), POV-Ray will start rendering a batch of POV-Ray scenes (here: 14 frames), which will look like this:
By default, the dialog opens the resulting AVI video file or - like in our example, where "Create an AVI file" is switched off - the first image of the image series. (The preview command shows a video anyway.) With the command Open Folder we can view (or post-process) the resulting image files in the Windows Explorer:
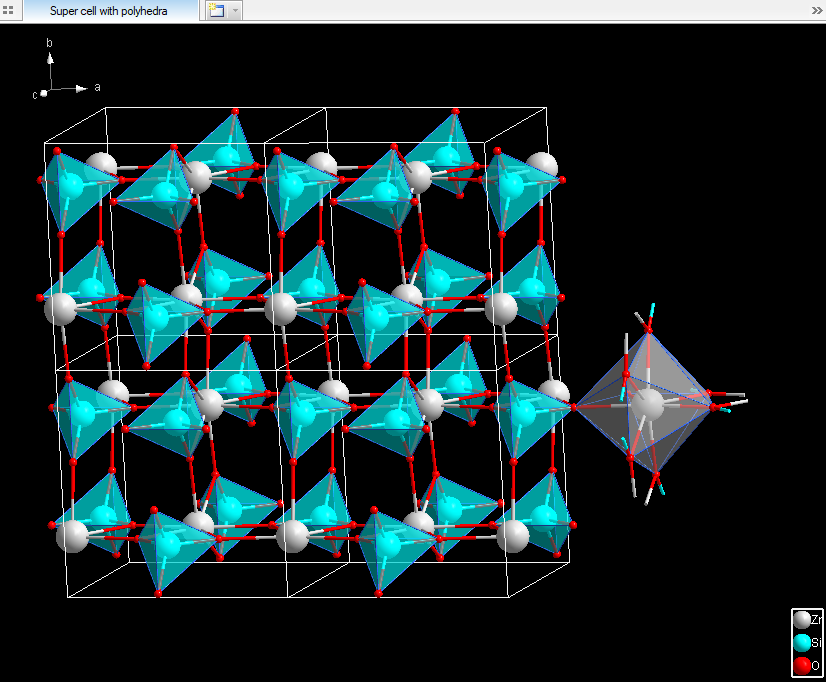
Creating a sequence from selected pictures Besides this you can compile pictures from different sources, i.e. different structure data sets, e.g. to render a POV-Ray sequence of a phase transition. Creating an animated POV-Ray sceneThough similar to the above described way to create sequences from multiple pictures - either recorded steps of a single picture or a bunch of selected pictures - the command "Animated POV-Ray Scene..." in the "Tools/POV-Ray" submenu operates on a single structure picture. It creates a POV-Ray scene containing a rotational or shifting animation. This kind of animation is not an internal animation (not something like e.g. "for istep = firstframe to lastframe" or so) but an externally driven animation. The scene file e.g. contains a "rotate <0, 360*clock, 0>" to rotate the whole scene for 360*clock degrees before it finally renders it. clock goes from 0 through 1 by default, with 0 for the first and 1 for the last frame. The content of the clock variable is driven by external command line parameters for initial frame and final frame, rsp. For instance running the animation with a frame range of 1 through 360 creates 360 frames describing a rotation along the y-axis for 360 degrees with a delta of 1 degree each. POV-Ray renders the frames into files named e.g. title001.png through title360.png. Using "1-clock" in a clock term results in a reverse rotation (or other kind of animation movement). Using clock terms with "^2" or "sqrt(...)" you can change the linear movement to accelerating or slowing movements. Such clock terms will be used in the "Animated POV-Ray Scene" dialog in Diamond. In our animation example, we will again start from the zircon example above and use the picture "Super cell with polyhedra":
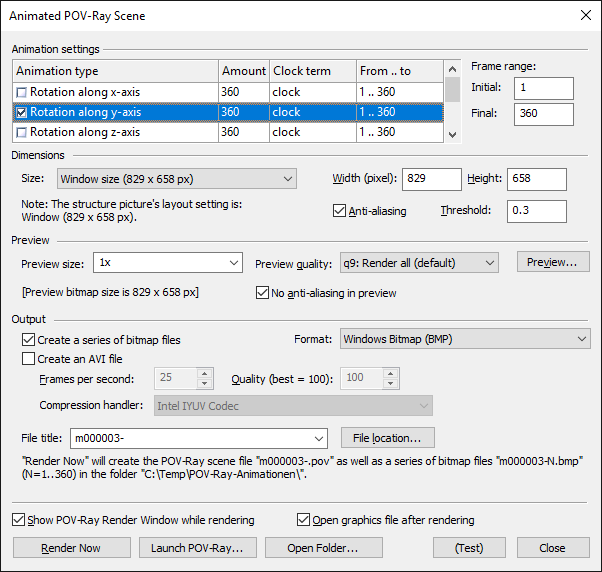
Running the command "Tools/POV-Ray/Animated POV-Ray Scene" opens the "Animated POV-Ray Scene" dialog. Most of the settings are the same as in the above described "POV-Ray Sequence" dialog, such as image/frame size, anti-aliasing, video settings, and the settings for file title and location.
Here we will focus on the animation settings at the top of the dialog. In our example we will run a full 360 degree rotation along the y-axis, starting from the current position/orientation. So we set the checkmark at Rotation along y-axis (and clear checkmarks for the residual animation types, if necessary) and enter "360" into the "Amount" field. Since we want to have a rather smooth animation with just one degree per frame, we set Initial to "1" (which is the default anyway) and Final to "360". Like in the "POV-Ray Sequence" dialog we have the chance to run a preview before we start the actual rendering of the video or the image series, rsp., and we can view or post-process the results in the target folder using "Open Folder...". "Launch POV-Ray..." can be used to open the POV-Ray scene with the animation instructions in the POV-Ray editor - provided the editor has been installed, cf. the online help for the dialog window (F1 key). In our case we will receive a series of bitmap files named m000003-0001.bmp through m000003-0360.bmp, if we set the checkmark at Create a series of bitmap files in the middle part of the dialog, and a file named m000003-.avi, if the checkmark at Create an AVI file is set when we hit the Render Now button. Previous article: Creating POV-Ray scenes [1] COD: 9000684. Hazen, R. M.; Finger, L. W.; "Crystal structure and compressibility of zircon at high pressure crystal No. 1, 1 atm - before P"; American Mineralogist, 64, 196-201 (1979) |
|
Page last modified August 8, 2022. Copyright © 2022 Crystal Impact GbR. All rights reserved. Contact Webmaster |